Free Guide · Home Theater · San Antonio

Home Theater Planning Guide for San Antonio Homes

The room, the seats, the screen, the speakers and the wiring, in the order we plan them. From KZ Audio & Video, building home theaters in San Antonio and the Texas Hill Country since 1999.

Since 1999
In the Audio Business
Free Consult
No Pressure, No Pitch
Clean Install
We Leave It Like We Found It
5.0 Stars
34 Google Reviews

The Short Answer

How Do You Plan a Home Theater?

Plan a home theater in this order: the room, the seats, the screen, the sound, the wiring, and the gear last. Decide first whether it is a dedicated room you can darken or a media room that shares space with the house. Then set the seating, because the distance from the seats to the screen wall sets the screen size: for a 4K picture, sit about 1 to 1.5 times the screen's diagonal away. Pick a projector if you can control the light and a large TV if you cannot. Choose the surround format (5.1, 7.1 or Dolby Atmos) and the speaker types: in-wall and in-ceiling for a clean dedicated room, on-wall, bookshelf or tower where the walls stay closed. In a new build, the low voltage wiring goes in before drywall, and the speakers, projector and screen go in after. Finish with dimmable lighting, simple control, and calibration of the picture and the sound.

The order matters more than the budget. Get it right and a modest system feels like a real theater. Get it wrong and the best gear still feels like a TV in a spare room.

The Plan

Steps 1 to 5: Room, Seats, Screen and Sound

  1. Step 1: Start with the room

    The room decides more than any single piece of equipment. Before anything else, get honest about the space.

    • Dedicated room or shared media room? A dedicated room you can fully darken gives you the truest cinema experience. A media room that shares space with the house is more flexible and more social, and it can still be excellent. Decide which one you are building, because everything downstream depends on it.
    • Light control. Windows are not a dealbreaker, but they change what you should buy.
    • Shape and dimensions. Long rectangles are ideal. Note the door, closet, soffits and beams, because they shape where the speakers and screen can go.
    • Where the equipment will live. A closet, a cabinet or a rack in an adjacent space. Deciding early keeps the wiring clean and the room quiet.
  2. Step 2: Plan your seating first

    Your seating layout drives the screen size, the speaker placement and the whole design.

    • How many seats, in how many rows? One row keeps it simple. Two rows usually means a riser so the back row can see over the front.
    • How far back do people sit? The distance from the seats to the screen wall sets the right screen size. Measure it or estimate it now.
    • Risers. A riser affects wiring, lighting and sometimes ceiling height, so plan it early.
    • Comfort. Recliners, love seats or a big sectional all work. It is a personal choice and a real part of the budget.
  3. Step 3: Size the screen to your seats

    For a 4K picture, the sweet spot is a seat about 1 to 1.5 times the screen's diagonal away. A seat 10 feet (120 inches) back works with a screen of about 80 to 120 inches.

    • Closer or farther. Closer in that range feels more immersive. Farther feels more relaxed.
    • Older 1080p pictures need more room. Sit 1.5 to 2.5 times the diagonal away, or you will see the pixels.
    • Bigger is not automatically better. A screen too large for the room makes you turn your head to follow the action.
  4. Step 4: Choose a projector or a TV

    Neither is better. It depends on your room, and the right answer starts with your lighting.

    • Projector and screen when you can darken the room and want a 100-inch-plus picture that fills your vision.
    • Large TV when the room has daylight you cannot fully block, or you want maximum brightness and simplicity.
    • Simple test. If you can control the light, lean projector. If you cannot, lean TV.
  5. Step 5: Design the sound

    Sound is where the experience actually lives. Good sound makes even a modest screen feel cinematic.

    • 5.1 is the real entry point to surround: left, center and right up front, two surrounds beside and slightly behind your seats, and a subwoofer.
    • 7.1 adds two speakers at the back. Worth it in a dedicated room with seating away from the back wall.
    • Dolby Atmos adds speakers overhead, and it cannot be added cleanly after drywall. A 7.2.4 layout means seven speakers around you, two subwoofers and four in the ceiling.
    • Put real money into the center channel (it carries most of the dialogue) and size the subwoofer to the room, or plan for two in a larger room.

Step 6: Speaker Types

In-Wall, On-Wall, Bookshelf, Tower or In-Ceiling: Which Speakers Should You Use?

The sound format tells you how many speakers. The speaker type tells you how they live in the room. There are five, and most theaters mix two or three.

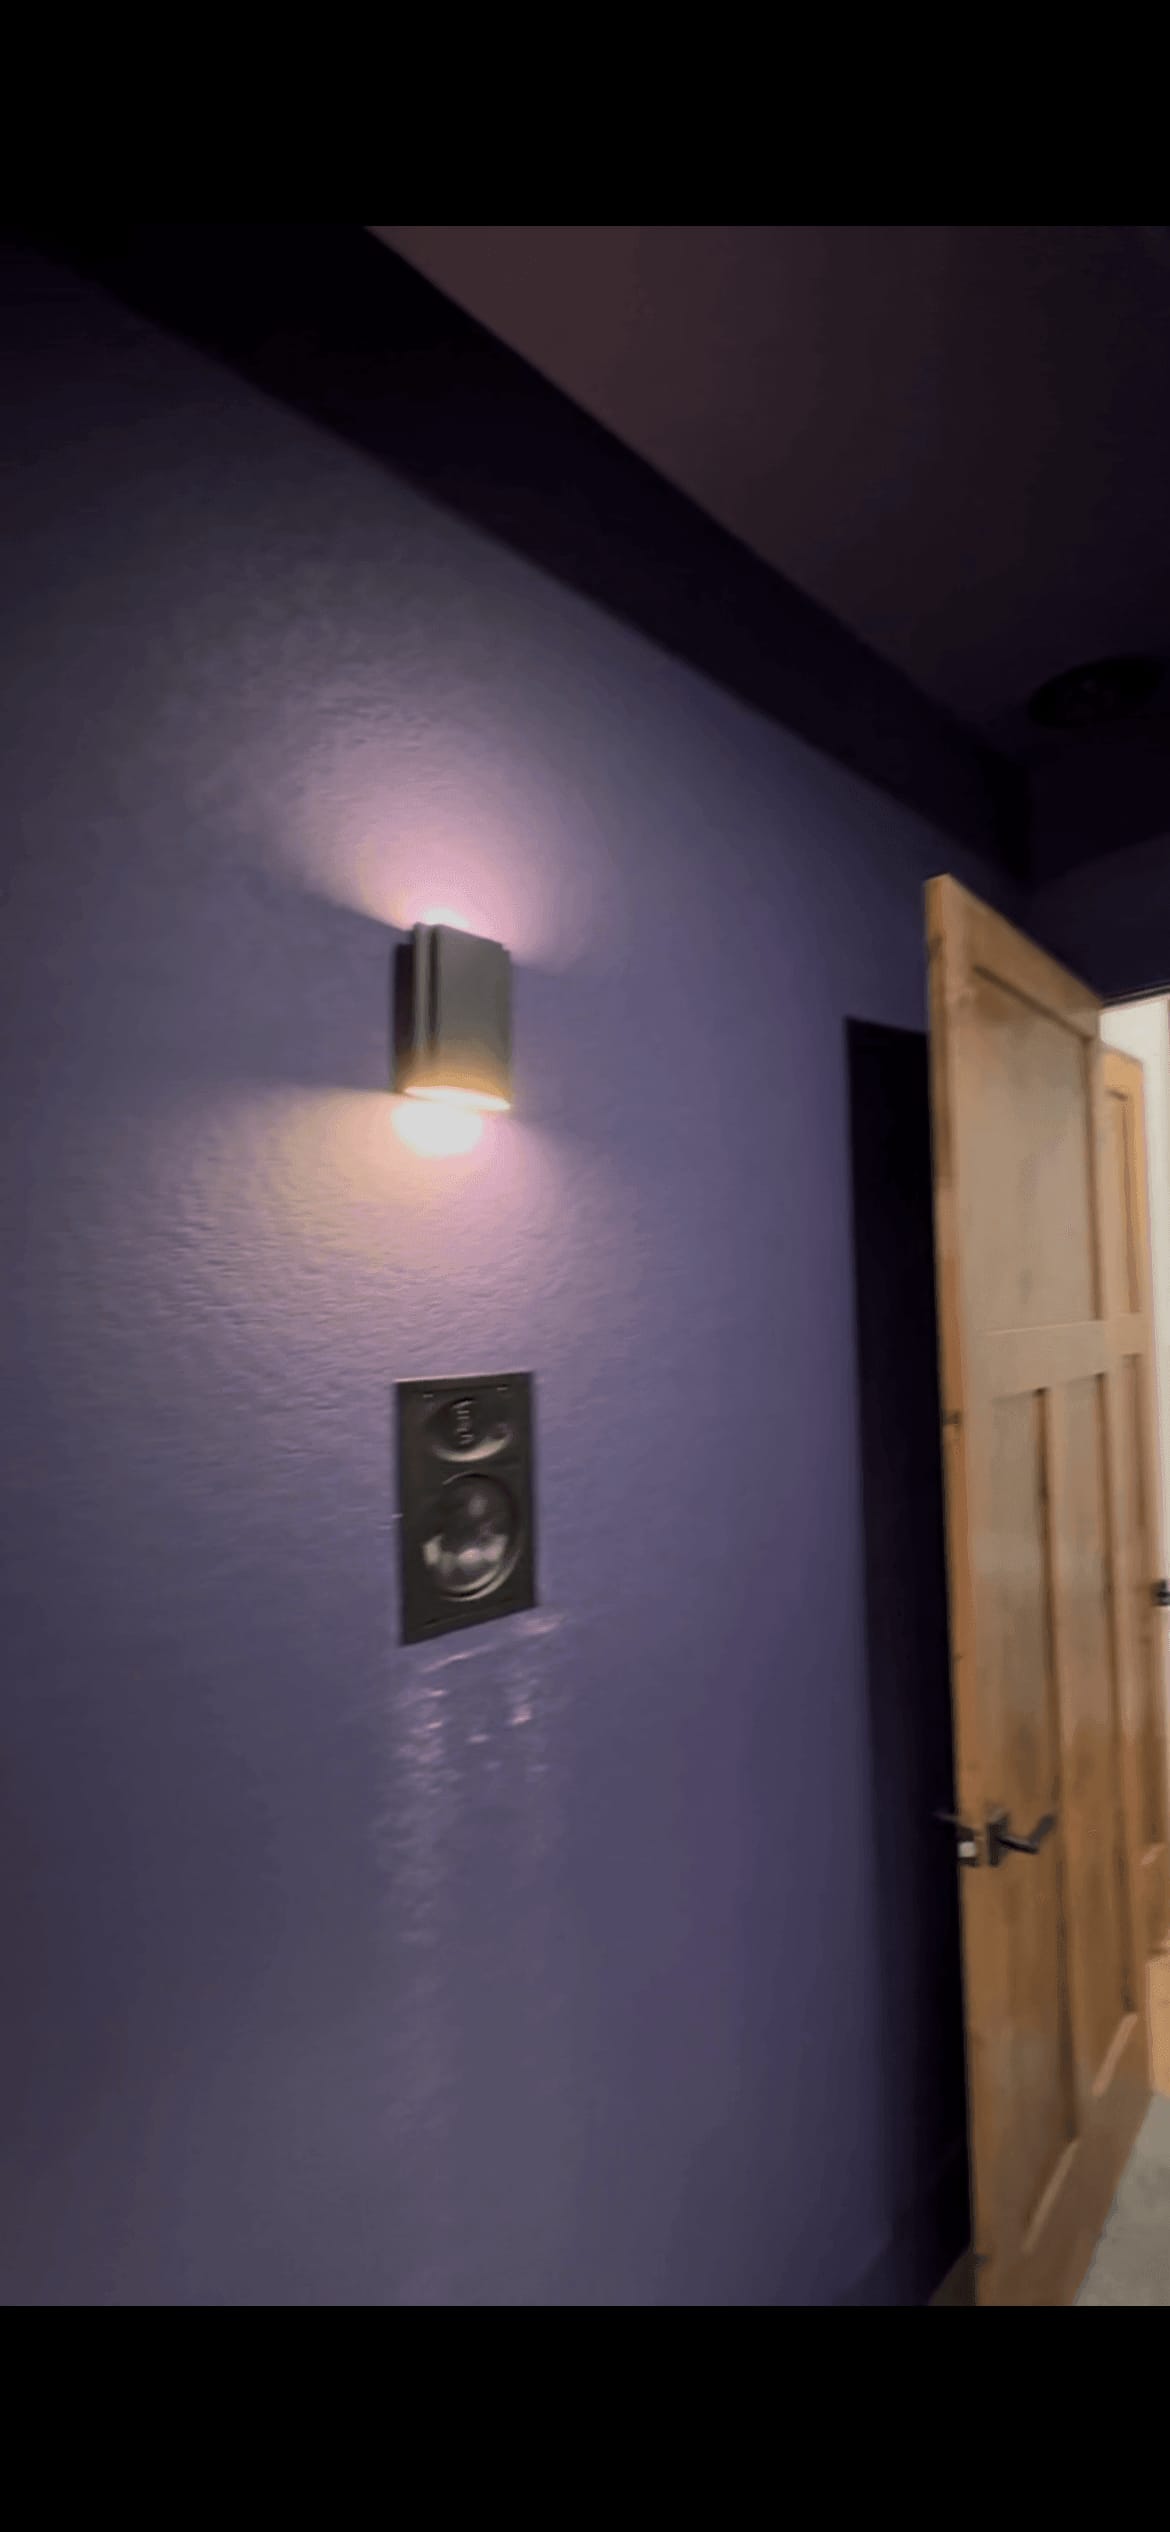
In-wall speaker mounted flush in a Canyon Lake home theater wall below a sconce, before the grille goes on
An in-wall speaker in a Canyon Lake theater, before the painted grille goes on.

In-wall

Built into the wall and flush, with a grille you can paint to match.

Where it goes: Front left and right at the edges of the screen wall. Side surrounds in a living room at 6 to 7 feet high.

Best for: Most dedicated theaters, because nothing sits on the floor or a shelf.

In-ceiling

Built into the ceiling.

Where it goes: Dolby Atmos height speakers about 45 degrees in front of and 45 degrees behind your main seat, not straight overhead.

Best for: Atmos, plus music in kitchens, covered patios and bedrooms. Upward-firing Atmos speakers are a compromise when the ceiling cannot be opened.

On-wall

A slim speaker that hangs on the wall surface, so there is no cutout.

Where it goes: The same spots as in-wall. The wire still runs inside the wall to each speaker, so it needs the same prewire.

Best for: A clean look without cutting the wall. One of our Stone Oak theaters runs Martin Logan on-wall speakers.

Bookshelf

A compact box speaker on a stand, shelf or cabinet.

Where it goes: Front left and right about 3 to 6 feet from the center of the screen.

Best for: Rooms with no wall work, and systems you may move or upgrade later. It takes shelf or floor space.

Floor-standing (tower)

A tall speaker that stands on the floor.

Where it goes: Placed like a bookshelf speaker, 3 to 6 feet from center.

Best for: Rooms with floor space on both sides of the screen. The bigger cabinet usually plays deeper and louder than a bookshelf speaker from the same line.

How to choose

A dedicated theater: in-wall and in-ceiling, so nothing clutters the room. A media room or living room: in-wall or on-wall up front, in-ceiling for Atmos. A room you cannot open up, or a system you plan to take with you: bookshelf or tower. Whatever you pick, keep the center channel from the same family as the left and right speakers, so a voice sounds the same as it moves across the screen. More on placement: where surround speakers go.

Finish the Room

Steps 7 to 10: Acoustics, Low Voltage, Control and Calibration

  1. Step 7: Acoustics and lighting

    This is the difference between a room with a big screen and an actual theater.

    • Acoustic treatment. Bare walls and hard floors create echo that muddies dialogue. Panels, carpet and soft furnishings tighten it up.
    • Lighting. Dimmable sconces and LED cove lighting set the mood and let you see without washing out the picture.
    • Wall color. Darker walls and ceiling reduce light bouncing back at the screen and noticeably improve contrast.
  2. Step 8: Run the low voltage before the walls close

    In a new build or a remodel, the low voltage comes first: speaker wire, network and the wire path to the screen go in at rough-in, before drywall. The speakers, projector and screen go in after the walls are finished.

    • Speaker wire to every location, including in-ceiling Atmos spots even if you add those speakers later.
    • Two subwoofer runs in a dedicated theater.
    • A conduit or wire path from the seating or equipment area to the screen wall.
    • Projector power and signal to the ceiling mount point.
    • A hardwired network drop and power where the equipment will live.
    The whole house, room by room: New Construction Prewire Guide →
  3. Step 9: Control and automation

    A theater you cannot easily operate is a theater nobody uses. The goal is one button that dims the lights, drops the screen, starts the projector and plays the movie.

    • Simpler setups: a good universal remote ties the pieces together.
    • Part of a smart home: a programmed home control system puts lights, shades, audio and video on one screen your family can actually use.
  4. Step 10: Calibration, the step that finishes the job

    Out of the box, no projector, TV or speaker system is tuned to your room. Calibration adjusts the picture (color, brightness, contrast) and the sound (levels, distances, room correction) so the system performs the way it was designed to.

    • Ask before you hire anyone whether they calibrate the picture and the sound, and how.

Avoid These

The Home Theater Mistakes We See Most Often

  1. Buying gear before planning the room. Room, seats, screen, sound, then gear.
  2. Mounting the screen too high. The center of the screen belongs near seated eye level.
  3. Skipping the low voltage stage. Adding wire after drywall costs far more than running it early.
  4. Picking speakers before the room. In-wall and in-ceiling speakers need their wire before drywall, so the speaker type is a framing decision.
  5. Undersizing the subwoofer. Bass is felt, not just heard.
  6. Never calibrating. Expensive gear, untuned, underperforms a modest system that is dialed in.
  7. Waiting too long to involve AV. The earlier we are in the conversation, the less you pay to fix later.

Since 1999

How KZ Audio & Video Plans Your Theater

Every install is done by our own team, never subcontractors, across San Antonio and the Texas Hill Country.

  1. Free in-home consultation. We look at the actual room and talk through how you want to use it.
  2. Custom design. Room, seats, screen and sound planned as one system around your space and budget.
  3. Low voltage first. In a new build, we run the wire at rough-in, before the drywall.
  4. Clean installation. Wires hidden, everything level, everything labeled.
  5. Calibration. We tune the picture and the sound to your room.
  6. The walkthrough. We do not leave until everything works and you know how to use it.

Keep This Handy

Your Home Theater Planning Checklist

The room

  • Dedicated room or shared media room decided
  • Light control assessed
  • Equipment location chosen

The seating

  • Number of seats and rows decided
  • Seating distance to the screen wall measured
  • Riser planned for a second row

Screen and picture

  • Screen size matched to seating distance (4K: about 1 to 1.5 times the diagonal)
  • Projector or TV chosen for the room's lighting

Sound

  • Surround format chosen (5.1, 7.1 or Atmos)
  • Speaker types chosen
  • Center channel and subwoofer prioritized
  • Ceiling wire planned if Atmos is a maybe

Room finish

  • Acoustic treatment considered
  • Dimmable lighting planned
  • Wall and ceiling color considered

Before the walls close

  • Speaker wire run to every location
  • Two subwoofer runs in a dedicated theater
  • Wire path to the screen wall
  • Network drop and power at the equipment location

Go Deeper

More Home Theater Answers

About These Answers

Every answer here comes from 20+ years of designing and installing home theater and AV systems in real homes. Kelly Zauber has been in the audio business since 1999. The numbers, formulas, and recommendations on these pages come from what actually works in the field, not from spec sheets.

KZ Audio & Video serves San Antonio, Stone Oak, Boerne, Helotes, Canyon Lake, New Braunfels, and the Texas Hill Country. About KZ →

From the Field

When a Radio Station Came Through the Surround Sound

In one living room we wired for surround sound, a radio station came through the speakers every time the receiver was on, even with it set to the TV input. It sounded like an AM station, and an AM radio tower stands just outside that neighborhood. In another house there, our tone tester (the tool we use to trace wires) picked up a radio broadcast every time we pressed its button. Yet that house, which we believe sits a little closer to the tower, ran surround sound with no trouble.

Nothing we tried stopped it. So we changed the system instead of fighting the house: a Sonos soundbar with Sonos rear speakers, surround sound with no receiver at all. That ended it.

A second house: one under-cabinet light

In another home, an older stereo with two tower speakers picked up interference on the radio whenever one under-cabinet light was on. Those lights are low voltage, and their transformer sat in the attic, where the speaker wires also ran. When the owner streamed music through the same stereo, using a streaming device we added, the noise never showed up. Only the radio did it, and only with that one light on. Clip-on chokes on the speaker wires did nothing there either. The fix was simple: leave that light off while the radio is on.

The lesson: in both houses the clip-on chokes did nothing. What worked was a different system in one and a light switch in the other, not a family living with the noise.

The first house: what we tried

  • A couple of different receivers
  • An electrician's check of the house's ground (it tested good)
  • Running it with and without the ground
  • Noise filters
  • Clip-on ferrite chokes on the speaker wires (they did nothing)

The first house: what worked

A Sonos soundbar and Sonos rear speakers: surround sound with no receiver in the room.

Questions About Your Specific Room?

Every room is different. Free in-home consultation: we come to you, measure the space, and give you a straight answer and a written quote. No pressure, no obligation.

Serving San Antonio  ·  Boerne  ·  Canyon Lake  ·  New Braunfels  ·  Hill Country

Call or Text: (210) 981-4098